-
1955
How to Create a Web API with Entity Framework Core in .NET 6
The ASP.NET Core Web API project type is one of the most potent and impactful project types in .NET 6. It eliminates the need for a person to rely on how to interact with data. This tutorial will help you create web API in .NET with Entity Framework.
Are you looking to create an ASP.NET Core Web API with Entity Framework 6? Are you looking for authentic sources to learn how to build web API that uses Entity Framework on top of .NET Core 6? We have simplified this for you. The tutorial helps you understand how to create ASP.NET Core Web API following simple steps forward.
Did you know as compared to ASP.Net 4.6, the .NET Core application can function 2300% faster as it can handle 1.15 million requests/sec?
This is massive, but do you know why it happens? Because the MVC and Web API development models of ASP.NET Core 6 are unified and use the same base class Controller. It makes it even better than PHP to some points.
Codzgarage is the leading custom software development company with core expertise in traditional to modern technologies. We work on comprehensive software development, including web and mobile applications, software migration, and integration. Contact us today to learn more about us.
Well, if you are a .NET Core developer, you must be aware of these technical facts —we have just made it simple and comprehensive for you. If you are a business owner and want to get one developed, then this is going to be a bit complex as you need to hire .NET Core developers to create a perfect Web API for you. The next question is:
Are You Looking to Create Web API in .NET Core with Entity Framework?
You might have plenty of resources to do, but none will you find as easy as we are to present for you. Creating Web API in .NET 6 is complex, but we have a simple solution. We have segregated them into simple steps with easy-to-understand language. You just need to follow a few steps given in this comprehensive tutorial. So, let’s create Web API now.
How to Create Web API
Web API using Entity Framework Core in .NET 6 is a straightforward process. It involves setting up the project, defining the data model, configuring the database connection, and implementing the API endpoints. However, it requires you to have a good understanding of .NET Core and its best practices.
It’s just simple 9 steps to create Web API in .NET 6.
Prerequisites
Like every project, this ASP.NET Core Web API needs a little preparation so you do not face any interruption when you begin coding on the core project. Before we start, make sure you have the following tools and knowledge in place:
- .NET 6 SDK installed on your machine
- Visual Studio 2022 or any other preferred code editor with .NET 6 support
- Basic understanding of C# and ASP.NET Core concepts
- Familiarity with Entity Framework Core and its basic usage
- SQL Server
Note: We have suggested this tutorial for ‘Visual Studio Core.’ There will be a little difference in prompts, steps, and code for each “Visual Studio, Visual Studio Core, and Visual Studio for Mac. You can connect with us.
Let’s explore the guide and create the .NET 6 Web API. Follow the steps one by one. While writing this tutorial, we assume you have basic knowledge of all the technologies mentioned, such as .NET Core, Entity Framework 6, C#, SQL, and the terms like HTTP/S, RESTful API, and others.
Step 1: Setting Up the Project
As usual, the first step begins with setting up the project development environment. For this project, you need to follow this process.
Here’s how you can set up the project:
- Open Visual Studio 2022
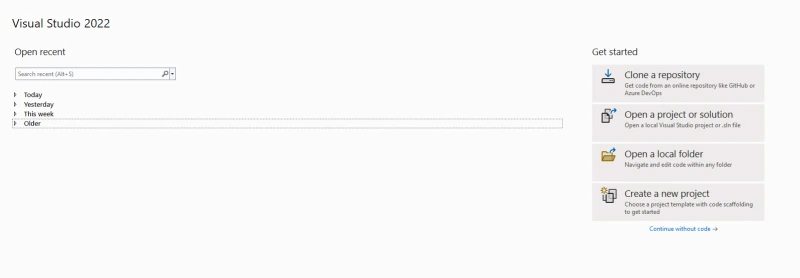
- Create a new ASP.NET Core Web API project
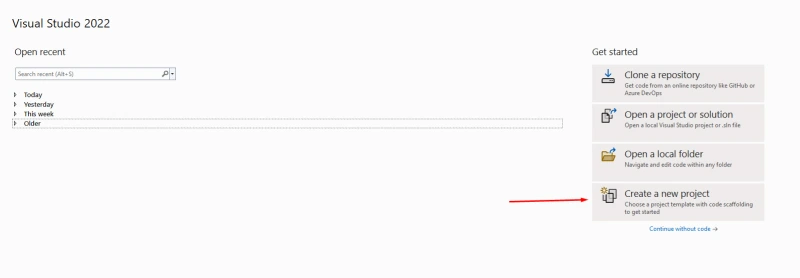
- Search ASP.NET Core Web API

- Select ASP.NET Core Template

- After selecting the template click on Next button.
- Give the name of your project
- Give the path of your project
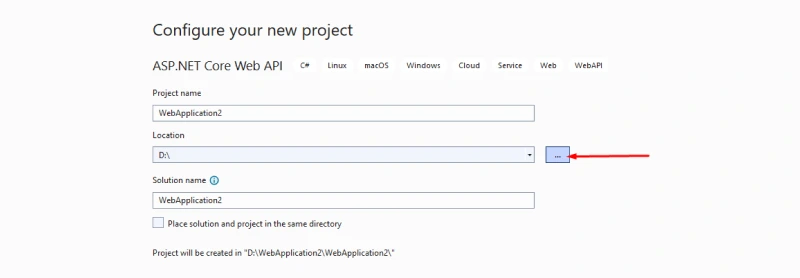
- After set the location click on Next button
- Select Framework as .NET 6.0
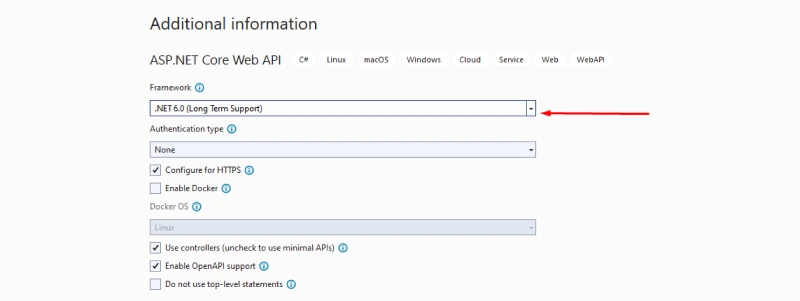
Note: Create it with .NET 6 as the target framework.
- Select the desired project template.
Note: Check the “Enable Docker Support” option if you want to containerize your application.
- Configure the project
With this, you have set up the project, that’s the beginning of Web API creation.
Step 2: Installing Entity Framework Core
Before you step forward, you must ensure you have installed the following packages.
- Click on Manage NuGet Packages to download below extensions.
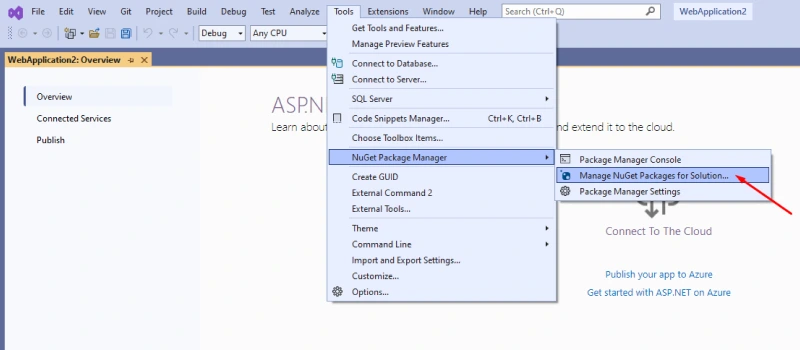
- 1. Microsoft.Entity.FrameworkCore.InMemory
- Search above extension name.
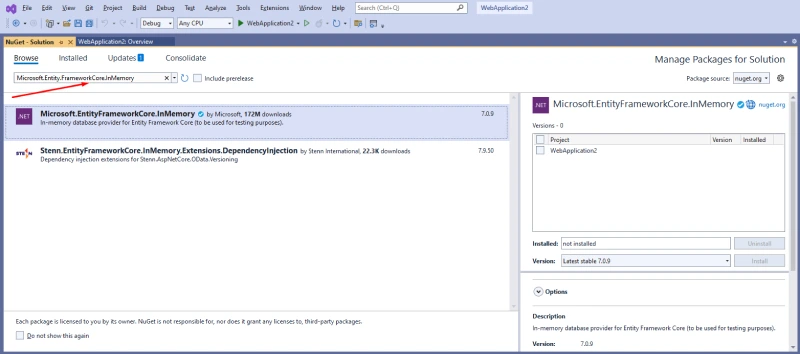
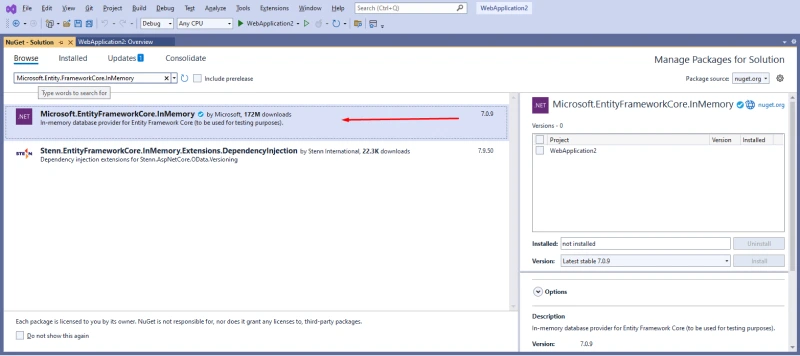
- Select the extension.
- Click on your Project.
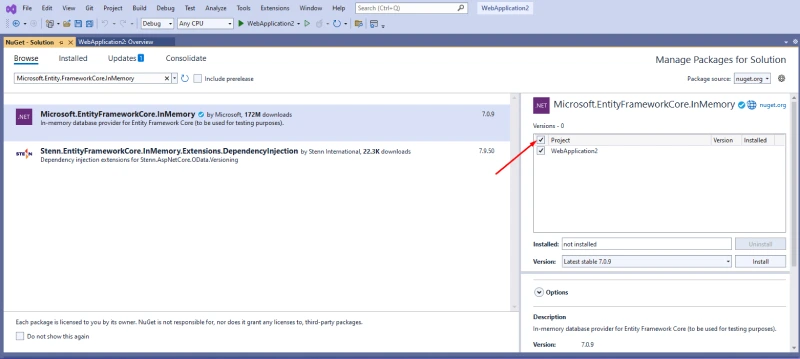
- Now Click on Install button.
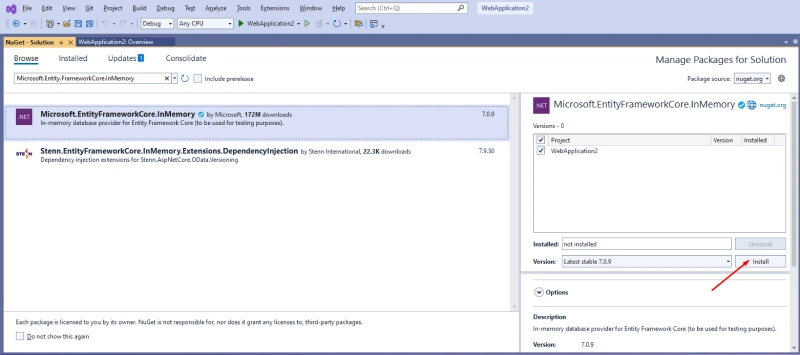
- 2. Microsoft.Entity.FrameworkCore.SqlServer
- Search above extension name.
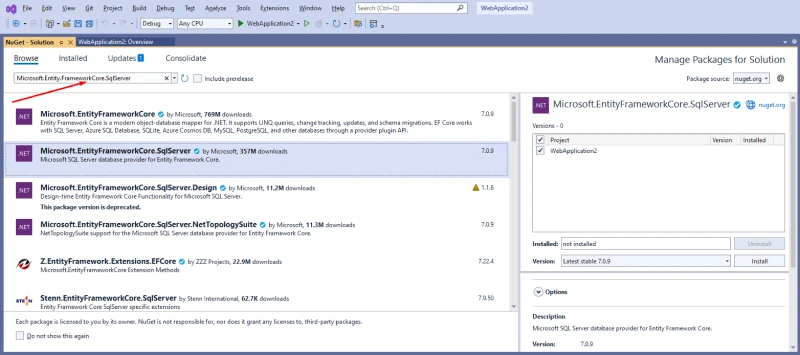
- Select the extension.
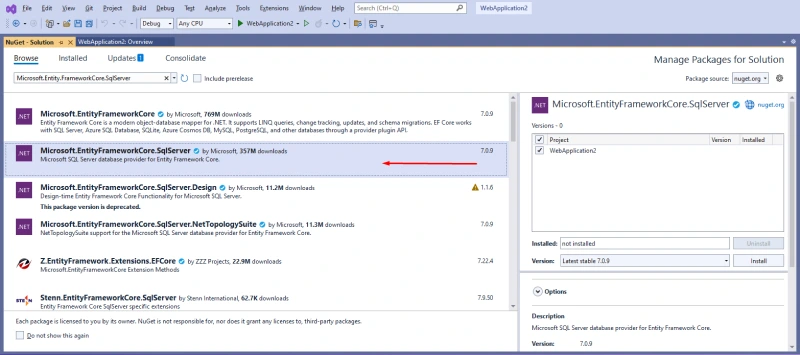
- Click on Install button
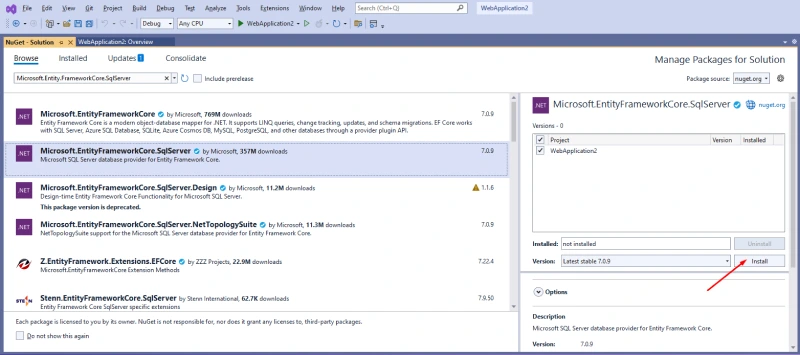
- 3. Microsoft.Entity.FrameworkCore.Tools
- Search above extension name.

- Select the extension.
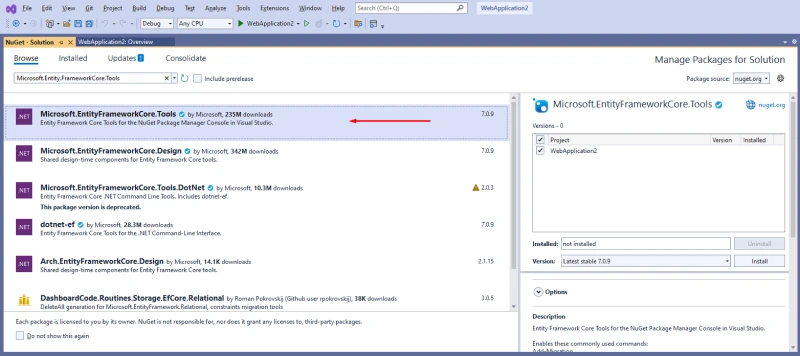
- Click on Install button
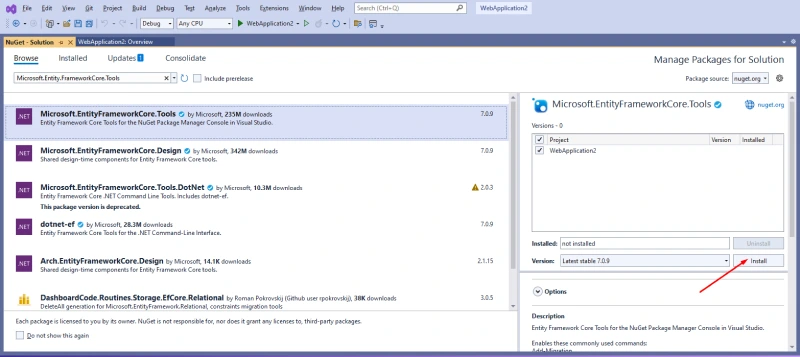
In the NuGet Package Manager, install the latest version of Entity Framework Core.
Also, install the database provider package (e.g., Microsoft.EntityFrameworkCore.SqlServer) suitable for your chosen database.
Step 3: Test the Project
You need to test if the project is created and running smoothly.
To test, you need to use the following commands to trust the HTTPS development certificate:
- Open the terminal window.
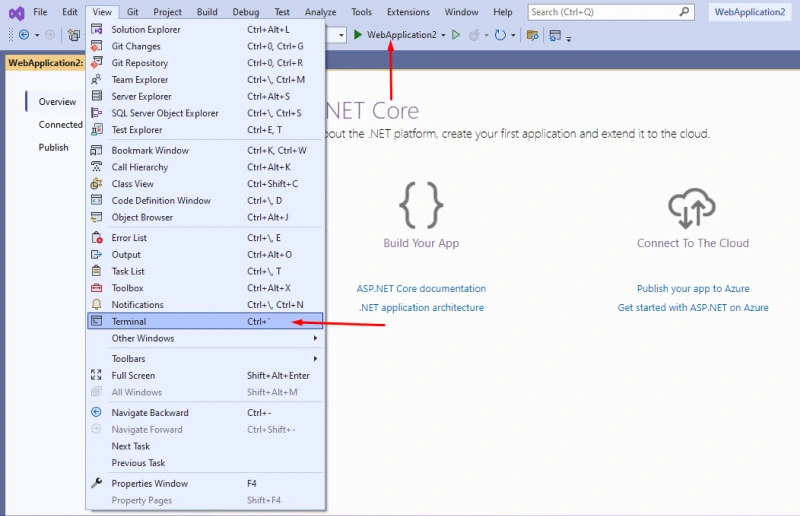
- If you don’t trust the certificate then write the command below.
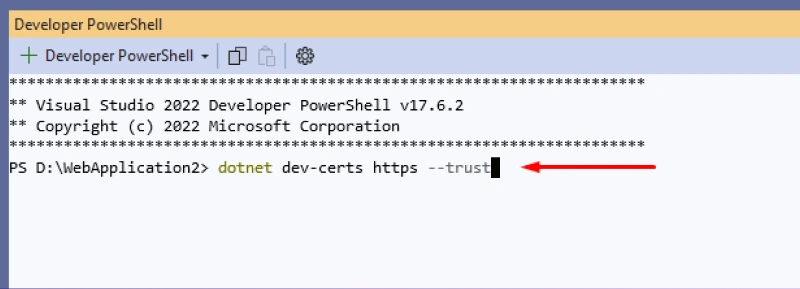
dotnet dev-certs https –trust
- You may be encountered with a popup dialogue as “Security Warning.”
- Just select “Yes” to trust the development certificate.
- Now, run the application by pressing Ctrl+f5.
- Choose .NET Core at the “select environment prompt.”
- You need to select “Add Configuration” and then “.NET.”
Now, replace <target-framework> with net6.0 and <project-name.dll> with TodoApi.dll. In the configuration JSON.
- Follow the same Ctrl+F5.
If you get the dialog “Could not find the task ‘build,’ you need to configure the task. For that, select;
- Create tasks.json file (from the template) and “.NET Core” and press Ctrl+F5.
- Use this “https://localhost:<port>/swagger”
Check if it runs successfully. If you face any technical glitch, you need to check GitHub to solve the error. If you still face the issue, connect with us; we shall help you eliminate the problem promptly.
Step 4: Creating the Model
Now you need to create or add a Model by following these steps;
- Right-click on the Solution Explorer
- Click on Add
- Select and click New Folder
- Give it a name —Models
- Click on Models and create Class
- Name it TodoItem
- Now, select Add
You will find existing code there; replace them with;
namespace TodoApi.Models;
public class TodoItem
{
    public long Id { get; set; }
    public string? Name { get; set; }
    public bool IsComplete { get; set; }
}
Design the data model for your application using C# classes. These classes will represent the database entities, and Entity Framework Core will map them to database tables.
Step 5: Creating the DbContext
Add a new class derived from `DbContext` and let it bridge your C# classes and the database.
To create, follow the steps given here;
Enter the following code;
using Microsoft.EntityFrameworkCore; using System.Diagnostics.CodeAnalysis;
namespace TodoApi.Models
{
    public class TodoContext : DbContext
    {
        public TodoContext(DbContextOptions options)
            : base(options)
        {
        }
        public DbSet TodoItems { get; set; } = null!;
    }
}
This command will help you add TodoContext.cs file to the Models folder. It will define DbSet properties for each entity in your model to enable CRUD operations.
Step 6: Configuring Database Connection
- You will need an appsettings.json file to add a connection string.
- In the `appsettings.json` file, add the connection string for your database.
Entity Framework Core will use this connection string to establish a connection to the database.
Step 7: Running Migrations
Now, you need to run migration by opening “Package Manager Console” and running the following command;
“` dotnet ef migrations add InitialCreate dotnet ef database update “`
It will create the database schema based on your model classes.
Step 8: Implementing API Controller
Create a new controller.
It will handle HTTP requests and interact with the database. Entity Framework Core will be in use for interacting with the database. Define methods for handling CRUD operations (GET, POST, PUT, DELETE).
You need to explore GET, POST, PUT and DELETE.
Step 9: Finally, Test the API
Run the application and test the Web API using Postman or Swagger UI tools.
Send HTTP requests to perform CRUD operations and verify the responses. If everything runs as you expected, you have successfully created it. You can also take the help of experts if you are not sure about this.
Creating Web API in .NET Core is a faster option you choose. Compared to .NET Framework, .NET Core is ideally ruling the roost for enhanced features and functionality. Creating Web API in .NET Core using Entity Framework 6 is more suitable.
Where Does Codzgarage Come in Between
We are a top-rated web and mobile application development company offering clients a wide range of services worldwide. We can help you in two ways:
You can connect with us with any or both of your requirements. We will help you with the perfect solution. We have been doing this for over a decade and understand modern business issues. Connecting with Codzgarage will help you get your application faster and cost-effectively.
Finally…
We have this article for you with the hope it will help you get all information you need to create an ASP.NET Core Web API using Entity framework. We have explored all options to be comprehensive and help you with every need. We also recommend you connect with expert advice before making a final decision. Contact us if you have suggestions, requirements, and consultation needs.
Want to
Hire .NET Core Developers?Our Expertise
- 11+ Years of Experience
- Vetted Engineers
- Deadline commitment




 Kevin Bhut